
A small home office desk has more cords running to it than a desk twice its size, because everything that used to sit in a separate room now lands on one surface. Laptop charger, monitor, a lamp, a phone charger, maybe a router and a printer, all converging on one power strip that sits wherever it landed the day the desk was set up. None of that is a decor problem. It is a routing problem, and it’s the one thing that makes an otherwise organized desk look like a mess the moment you look underneath it.
None of this needs a full rewire or a carpenter’s worth of cable channel. It needs the mess contained at the source, the runs lifted off the floor, and a couple of rules about what plugs in where. The order below starts with the step most people skip, which is looking at what’s actually back there before buying anything.
1. Count what’s actually plugged in before you buy anything

Pull the desk out from the wall before ordering a single organizer. Most people can name three or four cords from memory and are surprised to find seven or eight once they look, because chargers for devices that aren’t even at the desk anymore tend to stay plugged in indefinitely.
Separate what you find into permanent cords, the monitor, the tower, the router, and temporary ones, phone and laptop chargers that come and go. Permanent cords are worth routing properly since they’re not moving; temporary ones just need a spot to plug in without joining the tangle, a different problem solved in section 8. Skip this step and the tray you buy ends up sized for four cords when it needed to hold eight.
2. Contain the power strip and the slack in one box

The power strip is where every cord in the pile terminates, and it’s usually the ugliest part of the setup because six cords converge on one six-inch strip with two feet of extra cord looped behind it. A cable management box swallows the strip and all that slack at once, turning a visible nest into a single closed object about the size of a shoebox.
Get the vented model made for this job rather than grabbing a sealed storage bin from the closet. A laptop charger running all day throws off more heat than it looks like it should, and a box with no airflow just traps that heat against the plastic instead of letting it go. And don’t let the closed lid talk you into plugging in one more thing than the strip is rated for; you can’t see the overload once the lid’s on, but the strip doesn’t know that.
3. Give each cord a path instead of a straight shot across the floor
A cord lying flat on the floor gets rolled over by the desk chair, vacuumed against, and eventually snags a caster and drags the chair sideways. The fix isn’t picking it up so much as giving it somewhere specific to run: a cord crossing bare floor reads as clutter, and the same cord traced along the underside of the desk barely registers.
Adhesive cable clips hold a run along the back edge of the desktop, the underside of the desk, or the baseboard on the way to the outlet. Space them every 8 to 10 inches wherever the run changes direction, and choose an adhesive rated to carry more than the cord actually weighs, since a laptop charger’s thick brick end pulls harder on a clip than a slim USB cable ever will. Renting? Warm the clip with a hairdryer for a few seconds before prying it off; pulled cold, it tends to take a flake of paint or laminate finish with it.
4. Mount an under-desk tray to carry the bundle

Clips handle a single cord well; they get crowded fast once four or five need to travel the same route. An under-desk cable tray mounts beneath the desktop with clamps that grip the wood rather than screws, and carries the whole bundle, power strip included, in mid-air instead of coiled on the floor.
Position it toward the back of the desk, tight against the wall, so it clears your knees and stays out of view once you sit down. Most trays in this class hold several pounds of combined cable and hardware, comfortably more than a power strip plus six cords, but check the rating before hanging a full-size surge protector from one, since that’s closer to the limit than the product photos suggest.
5. Sleeve exposed runs so five cords read as one
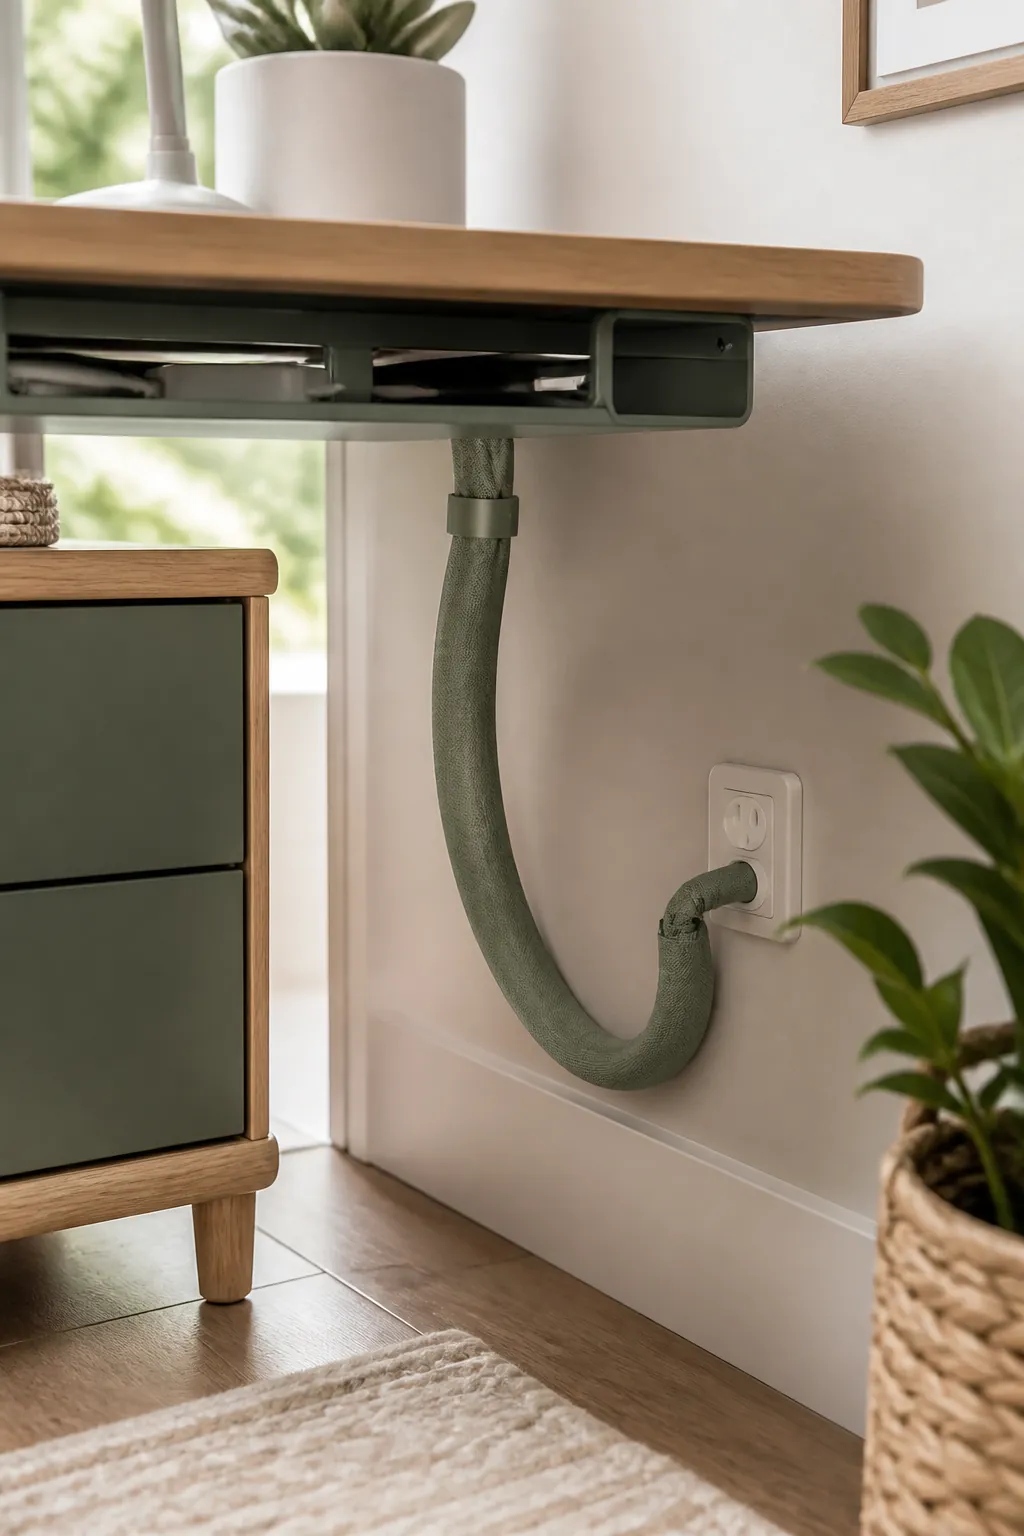
Whatever is still visible after the box and the tray, usually the last stretch between the tray and the wall outlet, is worth bundling into a single sleeve rather than left as loose parallel cords. A neoprene or fabric cord sleeve zips around a run of cables and turns five thin lines into one thick one, which reads as a single cable even though nothing about the cords themselves changed.
There isn’t a specific cord sleeve with a verified listing on this site, so the honest move is to name the product type rather than link one nobody here has checked. Look for one long enough to reach from the tray to the outlet with a few inches of slack, since a sleeve cut too short splits at the zipper the first time the desk gets nudged.
6. Give the router an open shelf, not a closed box

A router and modem generate more heat than they look like they should, and both need open air on at least two sides to shed it. It’s tempting to tuck them into the cable management box with the power strip since they’re already sitting in the same pile of cords, but a router sealed into a box with no ventilation runs hotter than it’s designed for, which shortens its life and can cause it to throttle speed or drop the connection under heavy use.
Give the router its own open shelf or the top of a low cart, away from the box entirely, with a few inches of clearance on every side. Its cord can still go through the tray; it’s the router itself that needs to breathe.
7. Label both ends of every cord you route

A cord routed neatly along a clip run still needs unplugging eventually, whether that’s for a repair, a move, or just tracing which cable belongs to which device when two look identical. A label maker printing small wraparound labels for each cord end takes a few minutes and saves the fifteen it costs later to unplug and test four identical black cables one at a time.
Masking tape and a pen work just as well if buying a label maker for this alone feels like overkill. What matters is labeling both ends, not just one, since the end at the power strip is usually the one you actually need identified, and it’s the one most people forget.
8. Keep phone and laptop chargers in a separate tray

The cords that come and go, a phone charger, a laptop charger for a device that isn’t always at the desk, don’t belong in the same routed bundle as the permanent cords from section 1. A small tray or shallow drawer insert near the front edge of the desk gives them a spot to coil loosely without adding another cord to the clip run or tray, which are sized for cords that stay put.
The failure mode is treating a temporary cord like a permanent one and clipping it into the main bundle. The next time that laptop leaves the desk, the cord gets yanked out of the clips or left behind, and either way the tidy run from section 3 is undone in about four seconds.
9. Respect the power strip’s amp rating instead of its outlet count

A power strip with eight outlets looks like room for eight devices, but the number that matters is printed on the strip itself, usually 15 amps for a standard household circuit. Desk electronics rarely come close to that limit, but the strip becomes a real risk the moment a second one gets plugged into the first to gain more outlets, which is exactly the workaround a full strip tempts you into.
If eight outlets aren’t enough, replace the strip rather than daisy-chaining a second, and never plug a space heater or anything with a motor into a desk power strip. Those draw far more current than office electronics and are the actual cause of an overloaded circuit tripping a breaker or overheating a cord never rated for that load.
10. Make the monthly check a five minute job

The system above only holds if something checks it on a schedule, because cords get added one at a time and one new charger never feels like enough to justify redoing the whole setup. Once a month, look under the desk, re-clip anything that’s worked loose, and confirm nothing new has been plugged into the strip without a plan for its cord.
A monthly check catches drift before it becomes a project. Skip it for six months and the one-cord-at-a-time additions add back up to the same tangle this list started by untangling.
Where to start

Start with the count in section 1, since it decides how big a box and tray you actually need. Contain the power strip first, route the bundle off the floor with clips and a tray, and keep the router on its own open shelf away from both. Sleeve what’s still visible, label both ends of anything permanent, and give temporary chargers their own spot so they never get roped into the main bundle. None of these steps take long on their own. Checked once a month, together they’re the difference between a desk that looks tidy from the front and one that’s tidy underneath it too.